

| Beetle Bros. Home | Robot Arena 2 | BBEANS |
| Arthrobotics | Downloads | Rules |
| Vanitas | Tutorials | Standings |
| Hall of Fame | ||
| Ironbot |
![]()
RA2 Building Techniques
- Basic Techniques
- Selecting alternate attachment points.
- Double-strength aluminum armor.
- Minimize chassis size.
- Build to the maximum.
- Use effective components.
- Using extenders effectively.
- Selecting alternate attachment points.
- Advanced Techniques
- Using wedges.
- Popups.
- Stacking batteries and other components.
- Burst- and Servo-overlapping/enhancing.
- Chaining spin motors.
- Caster armor.
- Project Trinity glitch.
- Chicken glitch.
- Using wedges.
- Expert Techniques
- Triple- and quadruple-stacking weapons.
- eFFe glitch.
- Rupt glitch.
- Axle loading glitch.
- Snapper loading glitch.
- Triple- and quadruple-stacking weapons.
Basic Techniques
- Selecting alternate attachment points. When you click on a component, in the small preview window by the description you may see several green boxes on the component. These are attachment points. Click on them to attach components in different ways. For example, attach a Z-tek horizontally by clicking the green box on the back.

Most components have an alternate attach point somewhere. - Double-strength aluminum armor. This is a handy little glitch that gives you armor as light as aluminum, but stronger than steel.
To get it, simply don't apply any armor to your bot. Ignore the Armor menu. The armor the game gives your bot by default is just like aluminum, but it is twice as strong and it isn't shiny (the tell-tale sign of "DSA" is to paint your bot black and rotate it around - it won't light up).
- Minimize chassis size. New players tend to draw a cool shape on the grid and then fill it with whatever components will fit inside. While this is easy and intuitive, DON'T DO IT. Instead, think about what kind of bot you want to build before you even enter the bot lab. Not just general designs like "vertical spinner" or "rammer", but decide what kind of drive it's going to have, how many batteries, and where any external components are going to attach. Try to imagine the arrangement of the internal components that you want, then design the chassis so it fits snugly around your bot, like a skin.
An oft-repeated RA2 maxim goes, "Make your chassis fit your components, not your components fit your chassis."
For example, let's say you want to build a heavyweight rammer with six HP Z-teks for drive, one Supervolt battery for power, and a baseplate anchor in the front to hold some ramming spikes. (This is a pretty standard setup. If you're confused about some of the component choices, keep reading and you'll get it eventually.) Doing your best to make a chassis that fits all of that inside it, you might come up with something like this at first:

You will learn to hate that semitransparent red look. Uh-oh. The HP Z-teks don't fit. What do you do now? You actually have several options. A bad builder would just use smaller motors that do fit, sacrificing the power of the HP Z-teks. A lazy builder would use baseplate anchors to attach the HP Z-teks outside the chassis. Or, a good builder would go back and redo the chassis, making it slightly larger so there's room for the HP Z-teks.
WHAT? Start all over from scratch? I'll lose everything I've done so far! That's right, but really, it's not that big of a deal as long as you haven't spent hours working on the weapons without making sure there's room for the drive motors beforehand. It takes less than five minutes to throw down those six motors, the battery, and the baseplate anchor to make sure they fit. If they don't, just redesign the chassis until they do; you're only losing a couple minutes of work.

Look at this monster chassis. This thing will crush opponents with its sheer size. Yay! Everything fits! Now you can start working on the weapons, right? Unfortunately, no. You're still not done with the chassis. It works, true, but look at all that extra space between the components that's not being used. That's a bad thing. The chassis should be as big as it needs to be, and no bigger. Wasted space is wasted weight. "But surely it's not that big of a deal," you might say. "This chassis is pretty decent, there's not THAT much extra space, and I probably won't lose much weight from shrinking it." Well, let's just see about that. Let's try optimizing the chassis of that rammer:

The final, optimized chassis. Snug as a bug and a pug named Doug in a mug on a rug. Wow! This new chassis is 32.5 kgs lighter than the old one! That's a whole HP Z-tek's worth of weight and more! (Or a Supervolt battery's worth, or three iron spikes, or whatever you want to use that weight for.) That's no laughing matter--an extra battery or a trio of spikes can easily make the difference between a win or a loss.
Let's go over exactly what I did here. The first thing I did is move away from the basic rectangle design. It's inefficient and leaves a huge gap between the rear drive motors that is tempting to fill with more batteries. (Don't do this. One Supervolt is enough power for this design, and filling space just for the sake of filling space wastes even more weight than leaving it empty.) A box is useful for some bots, but usually you want to think outside of it. So I narrowed the rear section as much as possible, widening it toward the front to make room for the battery. I also shaved off the front corners because the baseplate anchor and battery are longer than the front drive motors, and there's no point in making the whole bot longer just to accomodate one baseplate anchor.
Having come up with the new design, I turned off the "Snap To Grid" option on the chassis design grid. Snap To Grid is useful for quickly getting a rough approximation of what you want your chassis to look like, so you can see how the components fit inside and how much you need to shrink or enlarge it. However, when it comes to the final optimization, you want the freedom to move the nodes between the lines. If you restrict yourself to the grid lines, you will usually end up with a lot of wasted space. And then it was a lot of trial and error, moving the nodes little bits at a time, testing to see how well everything fit, and then moving them a little bit more.
Finally, I optimized the chassis height. This is a bit hard to grasp at first, as it involves moving the mouse very slowly and counting the number of "clicks" the chassis moves upward. However, it is very important to do, especially for this rammer, because it will mean the difference between being invertible or not (you can always use bigger wheels if your bot isn't invertible, of course, but that wastes a lot of weight when you could just as easily use small ones).
First, drag the slider all the way to the bottom. You might notice that if you force it, the chassis will actually get flatter than the theoretical "minimum" height. Ignore this for now. Just move the slider down to the point where it resists going down any further. Then, very slowly, move the slider back up and watch the chassis in the display window. You should see it "click" upwards in height. Count the number of these clicks in order to get the minimum height you need to fit your tallest component. For your convenience, here is a table of common chassis heights in stock RA2:
Tallest Component Chassis Height None (Minimum) Click very bottom pixel of height slider Supervolt battery with control board on top 2 clicks Nifty battery 4 clicks Z-tek/HP Z-tek 5 clicks Snapper 2 mounted vertically 6 clicks - Build to the maximum. Always utilize all the weight available to you. The more weapons and armor your bot has, the better it will be. You can certainly make a powerful 600kg heavyweight, for example, but if you don't fill up to that 800kg limit, you will most likely lose to any bot that does.

16 axe heads. This is a pretty tough rammer. But... 
...we can make it better. 30 axe heads. Let's compare these two rammers in battle.


Top: 16 axes. Bottom: 30 axes and cool skin. Only boring people leave the chassis white. The damage difference between the two is actually not all that great--only about 800. This is partly because the lighter version is slightly faster, and also because the more weapons you use, the harder it is to get them to all hit simultaneously. However, that extra 800 damage can be important. The 30 axes score a 1-hit knockout on the test chassis 100% of the time, while the 16 axes rarely manage to get a KO. Also, there are other factors besides just damage to consider. Each axe has 1000 hitpoints, so the 30-axe rammer has 30,000 total hitpoints, while the 16-axe rammer has only 16,000. Needless to say, the one with 30 axes will survive much longer in battle.
- Use effective components. Not all the parts in RA2 are balanced. Some are just better than others, and you should make full use of these. Click here for a neat table showing what weapons are really the best. So instead of using a sledgehammer, for example, use 3 iron spikes.
The best motors are reversible angle motors (for weight) and HP Z-teks (for power). Redbirds are okay but their shape often makes them hard to use. Normal Z-teks are the worst motor choice. For just 5kg more, you can get double the power, so the only place you will usually see normal Z-teks is in the lightweight class where 5kg is harder to come by.
The best wheels are shiny hub wheels for their light weight. Rarely will you need to use any other kind. Rubber wheels are usable on Z-teks if you want zero ground clearance, and slipperbottoms (often called "grannies" by the RA2 community) are most often used to achieve invertibility on taller bots.
The best extenders are by far the round ones. You might think the square extenders are stronger because they're heavier, but they're not: both types have the same hitpoints. As far as you're concerned, square extenders do not exist.
- Double-strength aluminum armor. This is a handy little glitch that gives you armor as light as aluminum, but stronger than steel.


Advanced Techniques
- Using wedges. Competitive RA2 is all about getting under the other bot. Being underneath the opponent gives you complete control over them--you can pin them against the walls, push them into hazards, flip them, and/or hit the unprotected bottom of their chassis. If you can't get under your opponent and you can't out-weapon them, you will almost certainly lose. Oftentimes, you will lose even if you do out-weapon them but can't get under. In fact, the "wedge war", as it is often called, is so important that it could be said that a bot is only as good as its wedge. Even a poorly built bot with a good wedge can beat an expertly built bot with a worse wedge. It's all about who has control of the fight.
Wedges aren't just for bots you would call a "wedge-bot", either. Virtually any bot will benefit from having a wedge, if not for the purpose of getting under the opponent, then at least to prevent the opponent from getting under them.

Hunter-Killer Tank can easily flip bots with its spinners, but it needs wedges to prevent other wedges from getting under it first. 
Neglected Waterbug is more of a classic wedge-bot. It needs to get under its opponent in order for its spinners to be effective. 
Rabid Pit Bull uses wedges both defensively, to make it hard to get under, and offensively, to scoop bots and get them on top of the grinding discs. So how do you make a good wedge? It's not an exact science; if there were some way to make "the best wedge", everyone would do it and every wedge war would end in a tie. There are some basic tips to making a decent wedge, but beyond that, anything you hear is like the Pirates' Code: more like guidelines than actual rules.
The first and most basic thing to keep in mind is that when I say "wedge", I don't mean a sloped chassis. I'm talking about a small wedge component on a burst motor. There's something magical about small wedges on burst motors that makes them able to slide effortlessly under anything, even bots with zero ground clearance. Remember EMERGENCY in the stock AI? Remember how hard it was to get under? That's because it has wedges on burst motors. (Side note: EMERGENCY wedges on burst motors are also good, but small wedges are usually slightly wedgier, and are smaller and lighter to boot, so EMERGENCY wedges are rarely used.)
Now burst motors are pretty heavy and it seems like a waste of weight if you're not even going to fire them as a flipper. You might be tempted to save weight by putting the small wedges on baseplate anchors instead. This is a common early mistake. Small wedges are actually no better than a sloped chassis unless they are on a burst motor. Far from saving weight, putting small wedges on baseplate anchors actually WASTES it as you might as well just use a chassis wedge.
The second basic wedge principle is this: Keep it simple. The best wedge setup is the simplest: one burst motor, one extender, and one wedge on the end. New builders often contrive some convoluted extender contraption to get two or more wedges on one burst motor, presumably to save weight or space. It's also fairly common to see weapons or armor attached to wedge extenders. However, this sacrifices wedginess. For whatever reason, wedges tend to lose their wedginess as you add more things on to the burst motor, especially if one of those things is a vertical spinner. NEVER put vertical spinners on the same burst motors as your wedges; it will make your bot bounce like a washing machine with a brick in it.
With some long wedges, the wedge extenders may be too fragile and you need extra protection. In that case, you can put something relatively flat and lightweight on top for armor without noticeably affecting the wedginess. Blades are the most commonly used, but I prefer spike strips or ice picks for the little bit of extra damage they do.

Basic dual-wedge setup. I put a spike strip on the left wedge for extra armor plus a wee bit of extra damage. The third basic principle of wedge design is to set your burst motor's starting point slightly below the bottom of your chassis. It will look like the wedges should prop up the front of the bot, but burst motors are actually flexible and the weight of the bot will push it down. This puts pressure on the wedge, and it seems to be this pressure that makes these wedges so powerful. The more pressure you have on your wedge, the better it tends to be. Try fiddling with the wedge start point, then going in the test garage to check if the front of the bot is propped up at all. The optimum wedge position is the lowest it can be without propping up the bot.

This is the optimum wedge position for this bot, just slightly below the chassis. Any lower and the front will get propped up by the wedges. And those three things are basically all you can do to guarantee a better wedge. There are a few other things you can try that MIGHT improve it, but keep in mind that no one really knows what makes a good wedge, and these tips are NOT guaranteed to work all the time.
- The type of burst motor you put your wedges on might make a difference. DDT's seem to be the wedgiest, followed by Snapper2's, with Snapper II's being the worst. However, there are bots with very good Snapper II wedges, and bots with very bad DDT wedges, and some players will tell you that Snapper2 wedges are the best. But the general consensus is that heavier burst motors are better.
- Weight distribution seems to be an important factor influencing wedginess. Putting more weight toward the front of your bot puts more pressure on the wedge, theoretically making a better wedge. I've found that weighting the very front part of the chassis with a few ballasts greatly improves wedginess - however, you have to consider whether you can use that weight more effectively for something functional, such as more weapons. Most bots can't afford to spend 40kg on wedge ballast.
- Don't raise your wedge burst motors, and if you're using vertical Snapper2's, put the axle low down, not high up. A shallow angle with the floor seems to be the best.
- Dual wedge vs. single wedge: In general, two wedges (one on the left and right sides of the bot) is better than one wedge in the middle. The only reason anyone uses a single wedge is because of weight limitations. In the heavyweight class, where you have more weight to work with, single wedges are hardly ever seen. You might think that a triple wedge would be even better, but this seems not to be the case; triple wedges are little if any better than dual wedges and the extra weight requirement makes them not worthwhile.
- Longer wedges are generally better than short wedges. However, they are also more fragile and prone to getting flanked, so you don't want them TOO long. 40 or 60cm out in front of the chassis is probably the most you want to go for most bots.
One final note: Does EVERY bot need a wedge? While every bot does benefit from having one, not every bot needs it. In particular, bots that focus on out-weaponing the opponent as a strategy rely less on wedges. This mainly includes horizontal spinners and rammers. Horizontal spinners have the added advantage of being able to knock bots to the side with their weapons, making them difficult to get under even if they don't have a wedge. You will sometimes see rammers with wedges, but horizontal spinners almost never have wedges. In this case, the weight is better spent on more weapons than on a wedge. Some vertical spinners and specialized anti-wedge bots also lack wedges yet can perform well. These bots typically have the chassis high up on "stilts", out of reach of the opponent's weapons, and are designed to hit the opponent's top if the opponent gets under them.
- Popups. Ah, popups. Love them or hate them (and most hate them), they are one of the top two most-used designs in RA2 (the other being horizontal spinners) and you will need to learn how to deal with them.
Popups get their own section on this page because they don't exist in real life. Other RA2 designs, like spinners, flippers, and rammers, are common in real life and you are no doubt familiar with them. But popups are something else; if you tried to build one in real life you would end up with just a regular flipper. Popups are essentially damaging flippers. Getting flipped is bad enough, but popups will score hundreds of points of damage and break components in the process. And worst of all, those hundreds of points of damage are all going to the underside of your bot, where it is difficult to put adequate protection. Popups can completely bypass most bots' weapon systems and hit the chassis directly for a quick KO.
Popups get their name because the weapons are usually hidden inside the chassis. From the outside, they appear to be a relatively harmless wedge bot. But once they get under their opponent, the weapons "pop up" to hit the opponent's underside.

Typical popup with weapons retracted. 
Typical popup with weapons firing. I'll give you some tips on how to build popups first, and then tell you how to defend against them. If you are building a popup:
- Don't use too many weapons. This is rather counterintuitive given that every other kind of bot always benefits from more weapons, but since popups have their weapons safely hidden most of the time, they only need enough to score a quick KO. Any extra weapons just add weight and make the weapons swing slower, which can actually REDUCE damage. As a general rule, you should not put more than about 5-6 razor tips on a single burst motor. Four is a more typical number.
- Use razor tips. Razor tips are the ideal popup weapon: lightweight, highly damaging, and their reduced hit points hardly make a difference when they hardly ever get hit. Simply put, razors are superior to any other weapon choice. Iron spikes have more hit points, sure, but they are heavy and less damaging and you don't really need more hit points, you want more damage. The only time you might see iron spike popups is if the weapons are held in front instead of hidden by default. Every other time, it will be razors.
- Don't skimp on drive. Popups need to be fast to be good. A slow popup is easy to knock aside with a horizontal spinner and will have a hard time getting bots up its wedge where they can be hit by the weapon. 99% of heavyweight popups have four HP Z-teks for drive, and 99% of middleweights have two HP-teks. Lightweights usually have two Z-teks but may have Redbirds or HP Z-teks.
- A shallow wedge is better. ("Wedge" in this case referring to the shape of the sloped front, not the burst motor wedge.) If the wedge is too steep, you will be easily KO'd by spinners and even rammers, and have a hard time getting bots up to your weapons. A shallow wedge is both harder to hit and easier for bots to slide up.
- The "Pyscolone Popup" is a bot-building challenge created by member Pyscolone. It is considered a test of skill in chassis space management and component stacking; completing it proves that one had entered the ranks of "good bot builders". A Pyscolone Popup must be a middleweight and include all of the following:
- Double-strength aluminum armor.
- Two HP Z-tek drive.
- Rubber wheels.
- Two Supervolt batteries.
- Three DDT burst motors.
- Eight razor tips.
- One small wedge.
- Double-strength aluminum armor.
If you are fighting a popup:
- The best defense is a good offense. Popups can't hurt you if they can't get under you, so all you need to do is have a better wedge and get under them first and you're safe. Easier said than done, of course, but putting defensive wedges on your bot is always a good idea.
- For wedgeless bots, caster armor (described below) is a very effective defense. Mind you, it's not foolproof, and you can still get flipped, but every hit it absorbs could be the difference between a win and a loss.
- Use anti-wedge weapons that can hit bots underneath you. Hammers, vertical spinners, and pokers are particularly effective at hitting bots from above. However, you will need to protect your chassis somehow, or else popups will KO you from underneath faster than you can KO them from above.
- Stacking batteries and other components. Some components can be overlapped in the same spot if you position them just right. When you can place two or more components so that they partially or completely overlap, it's called a "stack" in RA2 jargon. Chances are, you've already discovered a few stacks on your own with one component or another. Probably the easiest and most common type of stack is when you have several weapons that are very close together and should not be able to fit, but if you rotate them enough, you can get them to attach.

Keep rotating the axe until it attaches. It might take several tries, but there is almost always an arrangement that will work. Axes, iron spikes, razor tips, and pole spikes are all very easy to stack. Maces, pointy tips, ice picks, and bear claws, the other most-used weapons in RA2, are pretty much impossible to stack without the aid of other glitches. Seriously, don't even bother trying. It's not known what makes certain components more "stackable" than others, but some of them certainly are.
Stacking is not limited to components on extenders; it can also be done directly on the chassis. You've probably noticed that baseplate anchors are very easily stacked, and so are small battery packs. Supervolt batteries can be stacked too, and although it is more difficult to do, it is probably the most useful stack in the game. Mastering the Supervolt stack is something you will NEED to do if you plan to build in the heavyweight class. If you're really skilled, you can stack your control board inside a battery, which is particularly useful in the lightweight class (but also particularly difficult to pull off). The weight and space you save from doing these stacks may seem trivial at first, but trust me, it can be a lifesaver. I can't tell you how many times you will start building an awesome killer bot, and get almost finished, only to discover you are 3kg overweight.
An infinite number of other stacking combinations are possible, so much so that players will sometimes just post an empty chassis full of random stacks to show off their skills. However, most other stacks are either less useful, more specialized in their usage, or ridiculously difficult to perform, and I won't bother mentioning them.
So how exactly do you manage a difficult stack like two Supervolts? First, change the screen resolution to its highest setting if it isn't already. Now place the first Supervolt on the baseplate. It greatly helps if you leave some "wiggle room" around the first Supervolt - don't press it right up against the chassis wall, move it away a couple pixels. Now go to the Overview tab of the bot lab and zoom in all the way. When you go back to the Components tab, it will still be zoomed in, but it will zoom out if you move your mouse over the building area. Keep the display zoomed in and select the Supervolt battery. As long as you are "holding" the battery and don't click the mouse, the display will stay extra-zoomed. Now put the second Supervolt over the first and wiggle it around. With patience, you should find a spot where the game will let you put it, slightly offset from the first (this is why you leave wiggle room - stacking two Supervolts in EXACTLY the same spot is almost impossible). If it doesn't work after a minute or so, changing the camera angle sometimes helps.
Sage, a prominent member of the RA2 community and a skilled builder, has a nice video tutorial on stacking found here.
- Burst- and Servo-overlapping/enhancing. Burst motors and spin motors have the unusual ability to boost the speed of attached spin motors. Frustrated with even the HP Z-teks being too slow for your weapon? Put the HP Z-tek on a burst or servo motor and there will be a significant increase in speed. It's weird and it doesn't make any sense, but it's extremely useful, considering the generally slothful pace of most stock RA2 spinners. I mean these bots could probably compete at Dragon*con in real life. But be aware that burst- or servo-enchancing can also decrease your bot's stability. It is not recommended for wedged vertical spinners, as the bouncing will usually ruin your wedge.
There's a second advantage to putting your motors on burst or servo motors besides just the speed boost, though. This takes advantage of the fact that your own bot does not collide with itself. (Why not? I can only guess the programmers were smoking something they shouldn't have been.) So once you have your Z-tek on a burst or servo motor, you can swing the burst around or wire the servo to a control and rotate it... even into other components. So you could, say, move your Z-tek into your battery. It can't go there if you tried to attach it there, but there's nothing preventing it from being MOVED there after it is already attached.
Here's a four-step example of using a servo to overlap a spinner inside a battery. Note that with the servo, it always returns to its original rotation every time you load the bot, so you can't rotate it and expect it to stay there; you have to set up everything so it will be how you want without needing to move the servo. Same deal with the hidden attach point of the Snapper II.

This is just an example. Don't actually make a chassis this big because that defeats the purpose of overlapping. Instead of needing to fit a battery and a big bulky Z-tek, you now need to fit only a battery and a little servo. In order to save weight and space, you want to use as few bursts and servos as possible. Don't use two Snappers to attach your drive, four servos for your weapon, and two more Snappers for armor. This is grossly inefficient and you would be better off just putting everything on the baseplate. Use extenders to try and get as much stuff as possible onto one motor.
I should also warn that there is no point in overlapping just for the sake of overlapping. New players, upon learning how to do this, sometimes put everything on a burst or servo just because they can. This is also inefficient and downright wasteful if you don't use a tiny chassis to take advantage of all that overlapping power. You should overlap only what needs to be overlapped for your design, and put everything else on the baseplate.
- Chaining spin motors. Burst- and servo-enhancing weapons is nice, but it still doesn't approach the speeds you see on real-life bots. For that level of speed, you need to chain two motors together in a row, so the first motor spins the second one which spins a weapon. The final weapon speed will be several times faster than any single motor and pack a massive wallop. Even lowly Redbirds, when chained, far outstrip the HP Z-tek.
However, there is a drawback. This ludicrous speed comes at the cost of torque. Chained weapons are notorious for their long spinup times, and even once they get going they are fairly easy to slow down or stop. For this reason, they are almost exclusively used on vertical spinners, with the idea that they are powerful enough to fling and flip the opponent, and by the time the opponent recovers, the weapon will be back up to speed again. Chained horizontal spinners are simply too easy to stop to be effective, although they can be fun novelty bots for the first couple hits.

This bot uses a Z-tek chained with an HP Z-tek to spin its weapons at speeds not otherwise possible. Chaining three motors in a row is also possible, but it is generally not worthwhile as there is only a small increase in speed over a two-motor chain, and it is also far less stable.
As a final note: Remember that driving speed is determined only by the drive motor's power, not its speed. Chaining motors and putting a wheel on the end doesn't make your bot drive any faster than if you just used one motor. This is an understandable mistake and I'm sure we've all tried it at some point, but it's still a mistake; don't do it on any serious bot.
- Caster armor. You've probably noticed that anything you attach directly on the baseplate will never break. Your drive motors and batteries, for instance, never fall off or are even seen in battle, no matter how dented up the chassis gets. It's like they're there, but not there, invincible, invisible phantom components.
But there is one component that attaches directly to the baseplate yet still appears in battle, and that is the balance caster. Casters are still invincible just like anything else on the baseplate, but being visible and attaching externally, they can block hits. Clever bot builders have learned to abuse casters as invincible armor plating.

This spinner uses casters on the bottom to guard against popups. 
If you're clever, you can figure out some way to flip your bot during battle so the bottom becomes the top. This popup effectively has an invincible "front". As cool as invincible bottom armor is, there is another trick to using casters that makes them even more useful: you can raise them with the Control key just like any other component. Just raise a few casters, put them right on the edge of your chassis so they partially stick out, and suddenly you have invincible front or side armor.

This poker uses casters to make its front nearly impenetrable. Now you may be thinking, "Whoa, that sounds WAY too overpowered! This is like a game-breaking cheat here; why is it even allowed?" Well the answer is that there are a few limitations to using casters. The biggest one is that you can't raise them all the way to the top of your chassis, so caster-armored bots will always be vulnerable to high hits. The thin casters can be raised higher than the thick ones, but they still can't cover the top edge.
The second major limitation is simply weight. Casters are pretty light, but they're small, so you need a lot of them to make effective armor. All those 6kgs add up to a significant chunk of weight that is usually more than traditional snow plow or ram plate armor would cost. As a result, full caster-armored bots, as a general rule, don't have as much weapon power as regular bots. They can't out-weapon anything, so full caster armor is pretty much restricted to bots like popups and hammers, where the weapons are out of the way and don't get hit very often.
You can sort of get around the weight limitation by using a very small chassis, which requires fewer casters to protect, and/or by placing casters only at strategic points that are the most likely to get hit (front corners are a good spot). By using only a few, strategically placed casters, you can get a "partially invincible" chassis and still have enough weight for a good weapon loadout. This is probably the most popular application of casters.

Hostile Assault uses casters only on the front corners and the bottom edge, the most vulnerable areas of the chassis, and uses normal, breakable armor to cover the rest for a relatively low weight cost.


Expert Techniques
To do it, first attach two 20cm extenders parallel to each other using the side attach points. Then attach a third extender on the other side attach point of the first one and rotate it so it overlaps the second extender. It will look like two extenders, but it's actually three and you will be able to attach three spikes with a little patience.
Quadruple-stacking is a little harder. You need to attach a fourth extender on top of the second or third extender so it overlaps the first one. It will be harder to attach the weapons, and the 7 parts in a row limit will start interfering at this point, but it is possible. In theory, quintuple-stacking is also possible, but getting the spikes to overlap would be a nightmare (unless you combine this technique with the eFFe glitch, described below).
Simply hover whatever you want to attach over the moving component (let's say it's a tribar for this example) as if you were going to attach it, so it snaps to the connection point, but don't click. Instead, without moving the mouse, spin the tribar a little ways. Now click to attach the component - it will be attached to a point floating in space! If the arm of the tribar you initially attached the part to has multiple connection points (like if you attached an extender on the end) you can now attach more things on the other connection points without the first part interfering. When you are done, simply enter and exit the test garage, and all the parts you attached will reset to their normal positions and be overlapping in ways not possible otherwise.
To activate the glitch, simply use the side connection point of a 60cm extender and make it pointing sideways off a DDT burst motor. Then put something on the end that you want to rupt. Note that the object on the end of the extender can't be too heavy, and can't have too big a diameter or the glitch will not work. Also note that you need ample batteries to get full power (at least 2 Supervolts for a MW).
It is also possible to Rupt Snapper 2's, but it is considerably more difficult and much less powerful. Non-Rupting DDT's are probably a better choice.
You've probably noticed that whenever you attach a component with an axle (any kind of motor or an axle mount), all of your bot's motors start spinning freely. You might even have noticed that if you attach a lot of axles, your bot's motors spin faster. Now you can probably see where this is going. If you attach a lot of axles in quick succession, you can get your bot's motors spinning so fast the axles fly out into space. Once the motor axles are floating, you can put whatever you want where they would normally go, then enter and exit the test garage to reset their positions.
To get axle loading to work, first of all the target motor can't have too much weight on it. Empty motors with nothing on them work best, but you can manage to axle load with a shiny hub wheel attached if you have to. Powerful motors such as HP Z-teks also make it easier. Now you need to attach a lot of axles quickly. Put an axle (any kind of motor or an axle mount) somewhere on your bot, and as quickly as you can, pause the game (either by pressing the Pause/Break key on your keyboard, or quickly switching tabs in the bot lab if you don't have that key). Now attach another axle, pause, and repeat. Eventually, the target motor axle will fly out into space. You need to pause the game one final time when the axle is far enough out that it won't interfere with anything. Now you can overlap stuff where the axle would normally go, or you can put a bunch of stuff on the axle that would not normally fit.
If you're putting things on the loaded axle, note that components will attach where the axle SHOULD be (on the motor), not where it currently IS. Not to worry! Simply attach your stuff, then spin the motor and let it reset to its normal position. The axle will be back to normal, but the stuff you attached will be floating in space, where you can easily perform the eFFe glitch or do whatever you want to do.
Confused? This glitch is perhaps better explained with a video, so I made one:
A simple demonstration video of axle loading. (10 MB)
Sage also has an axle loading tutorial video here.
This is a very difficult technique, and rather than attempting to explain it, I will simply direct you to Sage's tutorial video.
Snapper loading is useful when you need to put the axle of a Snapper2 or Snapper II inside something else, or when you need to make a highly compact stacking setup on a Snapper II where the eFFe gltich alone just won't cut it.

Overlap two extenders both attached to the first one. 
Overlap two spikes on the two overlapping extenders for a total of 3. It will take a lot of rotating to get it to fit. 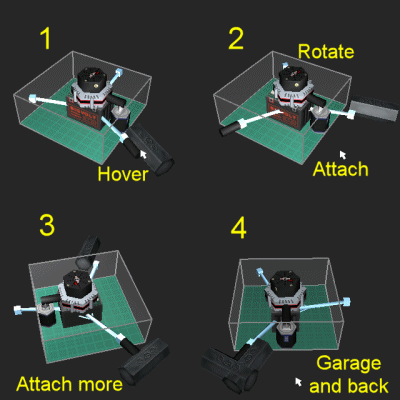
This glitch works great for stacking maces, which are pretty much un-stackable otherwise. (Don't actually use sledgehammers on a serious bot.) 
A basic middleweight Rupt flipper with two rupting flippers and one regular flipper for a srimech. 
A popup with two rupting flippers and two rupting razor tips. Rupt popups do not do significantly greater damage; the advantage is better flipping power.

